
When attempting to connect directly to a bank, QuickBooks frequently encounters QuickBooks error OL-301. This blog will discuss what causes it and how to fix it. Get in touch with QuickBooks' error support group immediately if you need instant assistance.

How to resolve QuickBooks error OL-301?
You should start by upgrading QuickBooks to the most recent version available. The profile settings will need to be refreshed at a later time.
Method 1: Try Clearing off Your Browser's Temporary Internet Folder.
- The "Delete Temporary Internet files" field displayed below will become active if you do not upgrade to the latest version of QuickBooks after that time.
- The Online Center can be accessed by selecting the "Tools" menu.
- Select Financial Institution from the pull-down menu to narrow your search. The selection of the financial institution should be made afterward.
- Hit the "CTRL" and "Shift" keys together, and then click the "Contact Information" button.
- One of the bank's associated accounts will be presented as a drop-down menu selection.
- To update your financial institution's branding and profile, select it from the drop-down menu and click the "Refresh" button.
- Once you're ready to go online, select the "Update/Send" tab and the "OK" button.
- Finally, you'll need to start your online sessions over.
- Before continuing, please clear your temporary internet files.
Method 2: For Windows 7 and 8 Users:
- To begin, select "Start" and then "Control Panel" from the menu that appears.
- Navigate your mouse to the tab labeled "Network and Internet" and click.
- Click on the “Internet” icon.
- Access the "Delete" tab in your browser's history by clicking the "General" tab.
- If you want to get rid of this data, click the "Delete all" button and then the "Yes" button.
- The final step is to click the "OK" button to complete the action.
For Windows 10:
- Click "Start" then "Control Panel" to get started.
- You can access the Control Panel in Windows 10 by clicking the "Start" button and then clicking the "Windows System" option.
- Select the "Internet and Network" button later.
- Type "Internet Options" into the search bar.
- Select the tab labelled "General."
- Select the “Delete” icon under the browsing history.
- Go to the tab labelled "Delete all."
- Select the "Yes" button to get rid of this data, and click the "OK" button.
If you have any issues with the windows version of QuickBooks, don’t hesitate to contact QuickBooks support.
For a different version of Windows
- To get to the Control Panel, if you can't find it, though, just do the following:
- To launch Windows, select the "Start" button and then the "File Explorer" option.
- Click on the "C: drive" icon and select the "Properties" menu item.
- Click the "Disk Cleanup" button.
- Then, you should deselect everything except Temporary Internet Files by clicking the corresponding box.
- To confirm, hit "OK" once more.
- To complete this procedure, select "Delete Files" from the menu to complete this procedure.
Method 3: Fix the Problem Manually
- You need to reset your bank's connection.
- Make sure all your "banking connections" are reset.
- Verify the status of your business's information.
- Make a call to your bank.
Method 4: Upgrade Your Desktop Version of QuickBooks.
- Intuit desktop bug fixes can be avoided with regular updates.
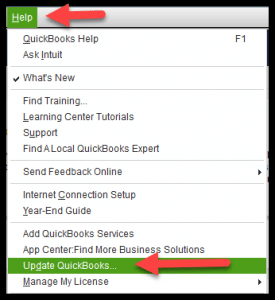
- The Help menu can be accessed by opening the QuickBooks windows on your computer.
- To update QuickBooks, just click the Update button.
- In that case, see if there are any updates for the program.
- Get back to QuickBooks after the update to see if the problem has been fixed.
Method 5: Review QuickBooks's Dormant Accounts.
- The first step is to choose accounts from the menu.
- Select the option from the Accounts menu to view inactive accounts.
- Select the profile and click the edit button.
- Bank feed settings menu > Deactivate all online services > check.
- Then, click Ok in the confirmation window.
- Verify the occurrence of the QuickBooks error OL-301 by restarting the desktop.
- Using the same procedure, you can terminate any inactive accounts.
Final Words
While using QuickBooks often, you could observe this QuickBooks error OL-301. Well, a few things could cause an OL-301 error, including a connectivity difficulty at the financial institution while using Direct Connect or an issue with the company's file. This post is only an attempt to provide the information you need to resolve QuickBooks error OL-301.
I hope the methods which are mentioned above can easily fix this problem but if you face any father issues then feel free to contact us at +1-800-615-2347. Our QuickBooks support team will assist you.